


There are a number of thanksgiving projects and crafts that homeschoolers from all over the nation can enjoy creating. This can be a very exciting learning activity that can include all members of the family. Here, we will review some of the top thanksgiving projects and crafts. It is important to remember that the best ways to create these projects are in a supplement to a lesson plan. For example, if you are creating a turkey thanksgiving craft, you may want to include a supplement lesson about turkeys. If you are creating a pilgrim project, of course, it would be best to include a lesson about pilgrims.
The Easy Turkey Craft
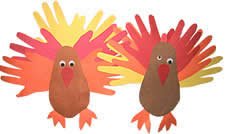
No Thanksgiving Day project would be complete without making at least one turkey. This easy turkey craft for the homeschool classroom can be created by all members of the family. Once the craft is completed, it can be hung on the refrigerator as a decorative magnet. The following outlines the steps required to make this easy thanksgiving craft:
1) Gather up some construction paper. It is best to use construction paper that implements the standard fall colors. These colors can include brown, white, red, black, orange, and yellow.
2) You should then gather up enough scissors for everyone to have their own pair, a glue stick for each person that is participating, some of those cute little wiggly eyes, and a strip of magnet.
3) The first thing that you should do is take the construction paper that you will be using for the body of the turkey. Each person should stand on the paper, with their shoes on. You can then trace the outline of the foot. Once each person has construction paper with their feet outlined on it, these may be cut out. This will be the body of the easy turkey project.
4) Next, everyone should take at least five to eight pieces of different colored construction paper and trace their hands on each piece. Once this is finished, each can cut out the hand shapes.
5) Now, the pieces that represent the body (the feet patterns) should be glued together. Place them together, and then fan them out slightly. Once this is accomplished, a small amount of glue should be placed between the pieces to hold them in place.
6) Next, the hand pieces should be lined up to look like a fanned out semi-circle of a turkey tail. These pieces should then be glued together.
7) Once the glue has dried on all the different pieces, the body of the turkey should be placed to the feather pieces.
8) Next, the cute little wiggly eyes should be placed in the proper area on the body of the easy crafted turkey.
9) Once this is completed, some feet should be made. This can be done by using small pieces of construction paper, or even little pipe cleaners.
10) When the turkey is completed, a small piece of magnet can be cut from the strip and glued on the back. You now have a decorative turkey magnet for thanksgiving!

Blessing Leaf Wreath
When thanksgiving rolls around, many families gather around to discuss the things that they are thankful for. One of the most exciting ways to count blessings is by making a blessing leaf wreath. Here, you will discover the steps for doing this in the homeschool classroom.
1) The first thing that you will want to do to create the blessing leaf wreath for the homeschool classroom is to gather a few supplies. Take an exciting trip outdoors and gather a large basket full of large leaves that are all different shapes and sizes.
2) You will then want to gather some different color construction paper, glue, and markers. Scissors and string are also important.
3) Next, all members of the homeschool family can trace the leaves onto the construction paper. Once this is done, each family member can cut out their shapes.
4) Next, each member of the family should write what they consider to be blessings on their leaves. Examples may be parents, friends, home, car, food, and similar things. Allow each family member taking part in this homeschool craft to be as creative as they want to be to ensure that the easy craft is fun and exciting.
5) Once this is completed, each leaf should be organized so that all leaves represent the shape of a wreath.
6) The next step is to take the glue and ensure that each leaf on the blessing wreath is glued in its place.
7) Once the wreath dries, you can take it and attach the string onto the back. You may elect to glue the string, or even staple the string. The idea is to get it as sturdy as possible so that it may be hung up on a wall in the home. Once this is done, you know have your very own blessing leaf wreath for thanksgiving.
As you can see, there are many exciting thanksgiving projects that the homeschool family can enjoy creating together. The simple projects outlined in this particular article can be enjoyed by family members of all ages! In addition to this, these projects make excellent supplements to thanksgiving and fall lesson plans. If you want to enrich these plans, there are other projects that can be created as well.


Add Comment